Veggie and Cheese Pinwheels
Looking for a quick appetizer or snack that’s both colorful and packed with flavor? Veggie and Cheese Pinwheels are the perfect bite-sized treats! They’re easy to make and an absolute crowd-pleaser.

This post may contain affiliate links. As an Amazon Associate, we earn from qualifying purchases.
Ingredients for Veggie and Cheese Pinwheels
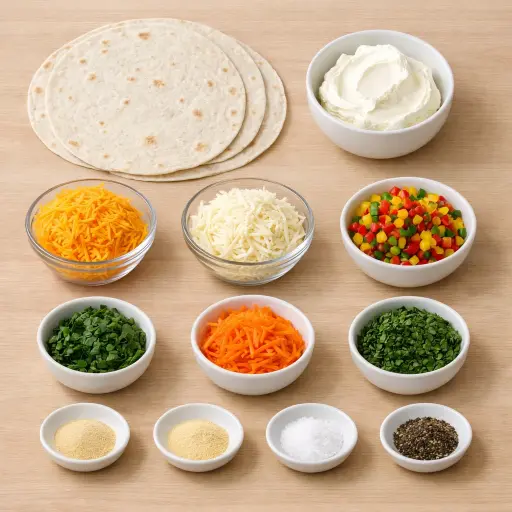
Flour tortillas form the base, holding everything together in a soft, chewy wrap. Cream cheese provides a rich, smooth layer that’s a perfect binder for other ingredients. Cheddar cheese adds a sharp, tangy flavor while mozzarella cheese brings a mild creaminess. Bell peppers add a pop of color and crunch, with their sweet flavor balancing the cheese. Spinach contributes a subtle earthiness and nutrient boost. Carrots offer a slight sweetness and satisfying crunch. Finally, garlic powder and onion powder infuse the filling with savory depth, while salt and pepper enhance all the flavors.
Why This Veggie and Cheese Pinwheels Works
The cream cheese is the base that keeps everything together. Once it is softened and mixed with the shredded cheeses and seasonings, it turns into a thick, sticky spread. That spread grabs onto the tortillas and clings to the chopped veggies, so the filling doesn’t fall out when the tortillas are rolled up.
As the tortillas are rolled tightly, the cheese mixture presses into all the little gaps between the bell peppers, spinach, and carrots. Air pockets get pushed out, and the roll holds its shape instead of loosening. Salt in the filling also pulls a bit of moisture from the veggies, so they sit better in the cheese instead of sliding around.
During the rest in the fridge, the cream cheese firms back up and the shredded cheeses stiffen a little. Everything settles and sticks together more. By the time the rolls are sliced, the pinwheels stay neat, the spirals look clean, and the pieces don’t fall apart on the plate.
Veggie and Cheese Pinwheels Tips & Tricks
- Make sure the cream cheese is at room temperature for easier mixing.
- Chill the rolls for at least an hour to ensure clean slices.
- Use a serrated knife for slicing; it helps maintain the shape of the pinwheels.
Mistakes To Avoid
Using cream cheese straight from the fridge keeps it too stiff, so it doesn’t spread smoothly and stays in clumps. This leaves bare spots on the tortillas and thick patches of filling. The pinwheels end up uneven, with some bites mostly tortilla and others packed with heavy cheese that can squeeze out when sliced.
Overloading the tortillas with filling makes the rolls hard to tighten. As they’re rolled, the mixture and veggies push out the sides, and the tortilla can crack or split. The pinwheels then don’t hold their shape and tend to fall apart on the platter.
Skipping the chilling time in the fridge means the filling stays soft and loose. When the rolls are sliced right away, the cheese mixture smears and the veggies slide out. The slices look messy, and many of the pinwheels won’t stay rolled.
Leaving the veggie pieces too large causes trouble when rolling and cutting. Big chunks create bumps that tear the tortilla and make the slices uneven. Some pieces end up with gaps or almost no filling in the center.
Equipment Used:
Ingredients
- 4 large flour tortillas
- 1 cup cream cheese, softened
- 1/2 cup shredded cheddar cheese
- 1/2 cup shredded mozzarella cheese
- 1/4 cup finely chopped bell peppers (red, yellow, and green)
- 1/4 cup finely chopped spinach
- 1/4 cup shredded carrots
- 1/4 teaspoon garlic powder
- 1/4 teaspoon onion powder
- Salt and pepper to taste
Step-by-step Instructions
- 1. In a mixing bowl, combine the softened cream cheese, cheddar cheese, mozzarella cheese, garlic powder, onion powder, salt, and pepper.
- 2. Spread the cheese mixture evenly over each tortilla, leaving a small border around the edges.
- 3. Evenly sprinkle the chopped bell peppers, spinach, and shredded carrots over the cheese mixture.
- 4. Tightly roll each tortilla into a log shape, making sure the filling stays inside.
- 5. Wrap the rolled tortillas in plastic wrap and refrigerate for at least 1 hour to firm up.
- 6. Remove from the refrigerator and slice each roll into 1-inch pinwheels.
- 7. Arrange on a serving platter and serve immediately.
Trending Now

Zesty Summer Squash Casserole
This delightful summer squash casserole combines vibrant garden-fresh vegetables w...
View Recipe
Classic Cucumber Salad
A refreshing and light cucumber salad featuring crisp cucumbers and a tangy vinaig...
View Recipe
Classic Banana Bread
Classic Banana Bread is a timeless dessert beloved for its moist texture and sweet...
View Recipe
Traditional Dump Cake
Discover the timeless delight of the Traditional Dump Cake, a simple and scrumptio...
View RecipeFrequently Asked Questions
- Can I make these pinwheels ahead of time?
- Absolutely! You can prepare them a day in advance and keep them wrapped in the fridge until you’re ready to slice and serve.
- What other veggies can I use?
- Feel free to experiment with zucchini, cucumbers, or even sun-dried tomatoes for a different flavor profile.
- Are these pinwheels suitable for freezing?
- It's best to enjoy them fresh, but you can freeze the rolled tortillas before slicing. Just thaw in the fridge before slicing and serving.
Serving Ideas for Veggie and Cheese Pinwheels
These pinwheels pair wonderfully with a light, tangy dipping sauce like a yogurt-based ranch or a balsamic glaze. For a more filling spread, serve them alongside a fresh garden salad or a bowl of soup. They’re also great as part of a party platter with a variety of dips and fresh veggies.
More Appetizers Recipes

Traditional Sausage Rolls
A timeless recipe for savory sausage rolls, perfect for parties or as a hearty sna...
View Recipe
Classic Dill Pickle Dip
A refreshing dill pickle dip perfect for parties and gatherings, featuring a cream...
View Recipe
Savory Bites on Sticks
Savory Bites on Sticks are delightful and colorful appetizers perfect for any soci...
View Recipe
Traditional Black Bean Salsa
Experience a burst of fresh flavors with this classic Black Bean Salsa, perfect fo...
View Recipe