Traditional Cream Cheese
Making your own cream cheese at home is a rewarding experience that transforms simple ingredients into something special. With just a handful of steps, you can enjoy fresh, creamy goodness that far surpasses store-bought versions. This recipe is straightforward, making it perfect for both beginners and seasoned home cooks alike.

This post may contain affiliate links. As an Amazon Associate, we earn from qualifying purchases.
Ingredients for Traditional Cream Cheese
Whole milk forms the base of this recipe, providing a rich texture and creamy flavor. Make sure to use full-fat milk for the best results. Heavy cream adds a luxurious smoothness and depth to the cream cheese, helping it achieve that signature richness. A touch of salt enhances the flavor without overpowering it, allowing the natural creaminess to shine. Finally, lemon juice acts as a natural acidifier, curdling the milk and cream mixture to form those essential curds.
Why This Traditional Cream Cheese Works
As the milk and cream warm up together, the heat starts to change the proteins inside them. Around 185°F, those proteins loosen and are ready to grab onto the lemon juice. Once the pan comes off the heat and the lemon juice goes in, the acid makes those loose proteins bunch up and form soft curds. Salt seasons everything at this point, but it also mixes into the curds while they are still forming, so the cheese tastes even all the way through.
After a short rest, the curds and the watery whey separate clearly. Pouring everything into cheesecloth lets the whey drip out slowly while the curds stay behind. Over time, gravity pulls out more and more liquid, so the cheese goes from loose and pudding-like to thick and spreadable. Leaving it longer, especially in the fridge, lets even more whey drain and the curds press closer together, which is why the cream cheese becomes firmer and smoother without needing any extra thickeners.
Traditional Cream Cheese Tips & Tricks
- If you don't have cheesecloth, a clean dish towel can serve as a substitute.
- Avoid stirring the mixture after adding the lemon juice; this helps the curds form properly.
- For a tangier flavor, let the cream cheese sit longer in the fridge.
Mistakes To Avoid
Letting the milk and cream boil hard instead of gently heating to about 185°F can cause the mixture to scorch on the bottom and form tough bits. Once that burned layer forms, it mixes into the curds and the final cream cheese tastes bitter and has little brown specks through it.
Adding the lemon juice while the pot is still on the heat often makes the curds form too fast and unevenly. The result is a grainy, rubbery texture instead of smooth, spreadable cream cheese.
Pouring the mixture into the strainer before clear curds have formed in the pot means most of the milk just runs through as liquid. In the end, there is only a thin, mushy layer in the cheesecloth and almost no real cream cheese.
Letting it drain for too long at room temperature, especially in a warm kitchen, can dry the curds out and make them crumbly. The cream cheese then spreads poorly and can taste slightly off from sitting out too long.
Equipment Used:
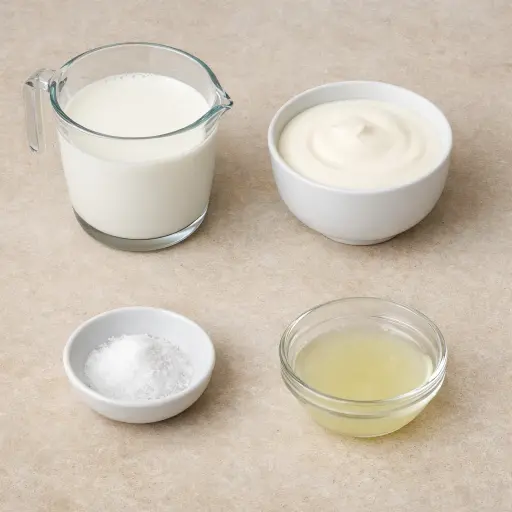
Ingredients
- 2 cups whole milk
- 1 cup heavy cream
- 1/2 tsp salt
- 2 tbsp lemon juice
Step-by-step Instructions
- Step 1: In a medium saucepan, combine the whole milk and heavy cream, and heat gently over medium heat until it reaches 185°F, stirring occasionally to prevent scorching.
- Step 2: Remove from heat, and stir in the salt and lemon juice.
- Step 3: Let the mixture sit for 10 minutes to allow curds to form.
- Step 4: Line a strainer with cheesecloth and set it over a large bowl. Pour the curdled mixture into the strainer to drain the whey.
- Step 5: Allow it to drain for at least 2 hours at room temperature until it achieves the desired consistency. For a firmer texture, refrigerate it overnight.
Trending Now

Zesty Summer Squash Casserole
This delightful summer squash casserole combines vibrant garden-fresh vegetables w...
View Recipe
Classic Cucumber Salad
A refreshing and light cucumber salad featuring crisp cucumbers and a tangy vinaig...
View Recipe
Classic Banana Bread
Classic Banana Bread is a timeless dessert beloved for its moist texture and sweet...
View Recipe
Traditional Dump Cake
Discover the timeless delight of the Traditional Dump Cake, a simple and scrumptio...
View RecipeFrequently Asked Questions
- Can I use low-fat milk?
- Whole milk is recommended for the best texture and flavor, but you can use low-fat milk for a lighter version, though the result will be less creamy.
- How long does homemade cream cheese last?
- Stored in an airtight container in the refrigerator, it should last up to a week.
Serving Ideas for Traditional Cream Cheese
This homemade cream cheese pairs beautifully with freshly baked bagels or spread over warm toast. For an elegant touch, serve it alongside smoked salmon and capers, or add a dollop to your favorite pasta dishes for added creaminess.
More Breads & Baked Goods Recipes

Traditional Italian Easter Bread
Savor the delightful taste of a classic Italian Easter bread, a sweet, soft, and s...
View Recipe
Old-Fashioned Pineapple Bread
A delightful and flavorful bread infused with juicy pineapple, perfect for breakfa...
View Recipe
Old-Fashioned Blueberry Muffins
Transport yourself to simpler times with these delightful old-fashioned blueberry ...
View Recipe
Strawberry Basil Scones
These tender scones combine the sweetness of fresh strawberries with a hint of pep...
View Recipe