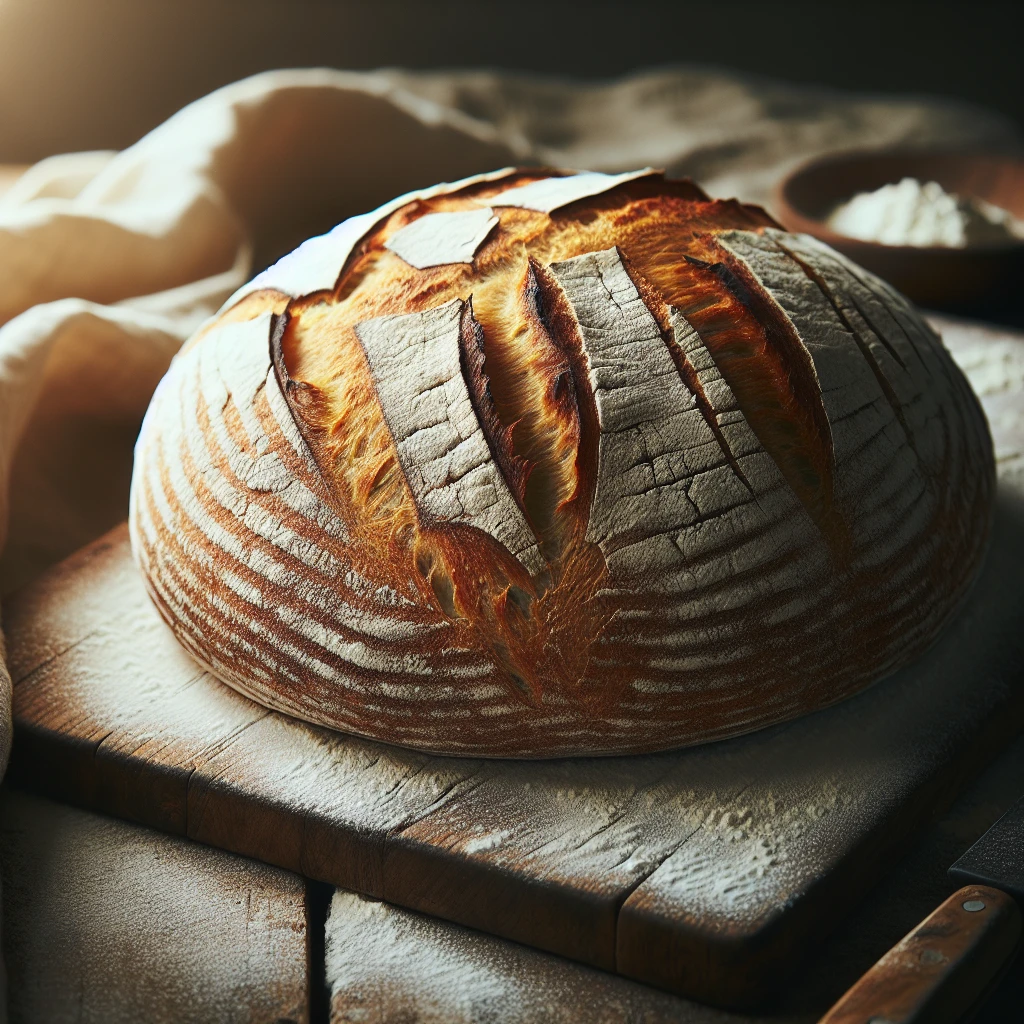
Timeless Rustic Bread
This Timeless Rustic Bread is everything you want in a homemade loaf: crisp on the outside, tender on the inside, and delightfully simple to make. With just four ingredients and a bit of patience, you'll have a loaf that will easily become a staple in your home.
This post may contain affiliate links. As an Amazon Associate, we earn from qualifying purchases.
Ingredients for Timeless Rustic Bread
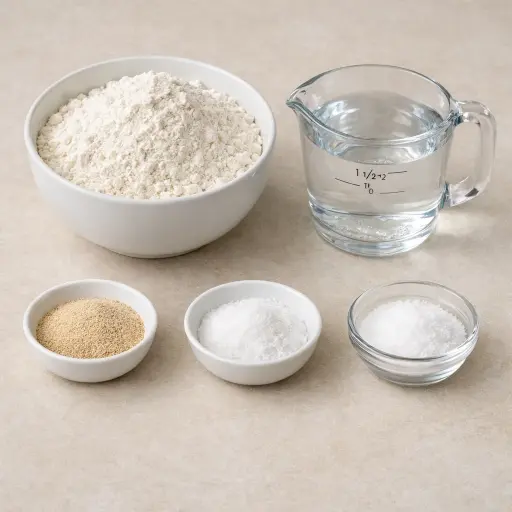
Flour: The backbone of your bread, providing structure and texture. All-purpose flour works great, but you can experiment with bread flour for a chewier bite.
Active dry yeast: Gives the bread its rise. Just a small amount is needed for this long fermentation process, allowing for a deeper flavor.
Salt: Enhances the flavor of the bread and helps control the fermentation process.
Warm water: Activates the yeast and brings the dough together. The warmth is key to kickstarting the fermentation.
Why This Timeless Rustic Bread Works
During the long rest, the flour slowly soaks up the warm water and the tiny bit of yeast has time to work. The dough starts out rough and shaggy, but over 12 to 18 hours it relaxes and stretches. Gluten forms on its own without much kneading, so the dough becomes stretchy and full of little bubbles. Salt keeps the yeast from racing too fast, so the dough rises slowly and evenly instead of blowing up and collapsing.
In the hot Dutch oven, the dough hits a blast of heat from all sides. The water inside the dough turns to steam and pushes the dough upward, so the loaf puffs and opens up. The heavy pot and lid trap that steam, which keeps the outside soft at first while the inside sets and holds its shape. Once the lid comes off, the surface dries out and browns, so the crust turns deep golden and crisp while the middle stays moist and tender.
Timeless Rustic Bread Tips & Tricks
- If your kitchen is cold, place the dough in a warmer spot like an oven with the light on.
- For extra flavor, try adding herbs or seeds to the dough.
- If you don’t have a Dutch oven, a heavy pot with a lid will work too.
Mistakes To Avoid
Letting the dough rise for only a few hours instead of the full long rise means the yeast barely gets going. The dough stays tight and heavy, doesn’t trap much air, and in the oven the loaf bakes up low and dense instead of open and airy inside.
Using water that is very hot instead of just warm can kill most of the yeast right at the start. The dough then sits for hours without really puffing up, and the baked bread comes out flat, pale, and gummy in the center.
Skipping the preheat of the Dutch oven or not getting it really hot first keeps the dough from getting that quick burst of heat. The crust sets slowly, the loaf spreads sideways instead of lifting up, and the bottom can turn out soft instead of firm and crisp.
Cutting into the bread while it is still hot from the oven lets the steam rush out too fast. The crumb compresses, the slices smear and tear, and the inside can turn pasty instead of staying light and slightly chewy.
Equipment Used:
Ingredients
- 3 cups all-purpose flour
- 1/2 teaspoon active dry yeast
- 1 1/2 teaspoons salt
- 1 1/2 cups warm water
Step-by-step Instructions
- 1. In a large bowl, combine flour, yeast, and salt.
- 2. Add warm water and stir until a rough dough forms.
- 3. Cover the bowl with plastic wrap and let it rise at room temperature for 12-18 hours.
- 4. Preheat the oven to 450°F (230°C). Place a Dutch oven in the preheated oven for 30 minutes.
- 5. Turn the dough onto a floured surface and shape it into a ball.
- 6. Carefully remove the hot Dutch oven and place the dough inside.
- 7. Cover with a lid and bake for 30 minutes.
- 8. Remove the lid and bake for an additional 15 minutes until the bread is golden brown.
- 9. Cool on a wire rack before slicing.
Trending Now

Old-Fashioned Bread Pudding
Discover the classic charm of Old-Fashioned Bread Pudding - a timeless dessert com...
View Recipe
Hearty Breakfast Casserole
This Hearty Breakfast Casserole is the quintessential morning dish, combining savo...
View Recipe
Traditional Stuffed Peppers
Explore the delightful blend of seasoned beef, rice, and tomato sauce nestled in v...
View Recipe
Traditional Lemon Pound Cake
A delightful and moist traditional lemon pound cake infused with the fresh zest an...
View RecipeFrequently Asked Questions
- Can I use whole wheat flour?
- Yes, you can substitute up to half of the all-purpose flour with whole wheat flour for a denser, nuttier loaf.
- What if my dough is too sticky?
- A sticky dough is normal, but if it’s unmanageable, add a little more flour when shaping.
- How do I store the bread?
- Store in an airtight container for up to 3 days, or freeze for longer storage.
Serving Ideas for Timeless Rustic Bread
This bread pairs wonderfully with a hearty soup or stew. It's also fantastic with a spread of good-quality butter and a sprinkle of sea salt. For a breakfast twist, top slices with avocado and a dash of chili flakes.
More Breads & Baked Goods Recipes

Traditional Italian Easter Bread
Savor the delightful taste of a classic Italian Easter bread, a sweet, soft, and s...
View Recipe
Old-Fashioned Pineapple Bread
A delightful and flavorful bread infused with juicy pineapple, perfect for breakfa...
View Recipe
Old-Fashioned Blueberry Muffins
Transport yourself to simpler times with these delightful old-fashioned blueberry ...
View Recipe
Strawberry Basil Scones
These tender scones combine the sweetness of fresh strawberries with a hint of pep...
View Recipe