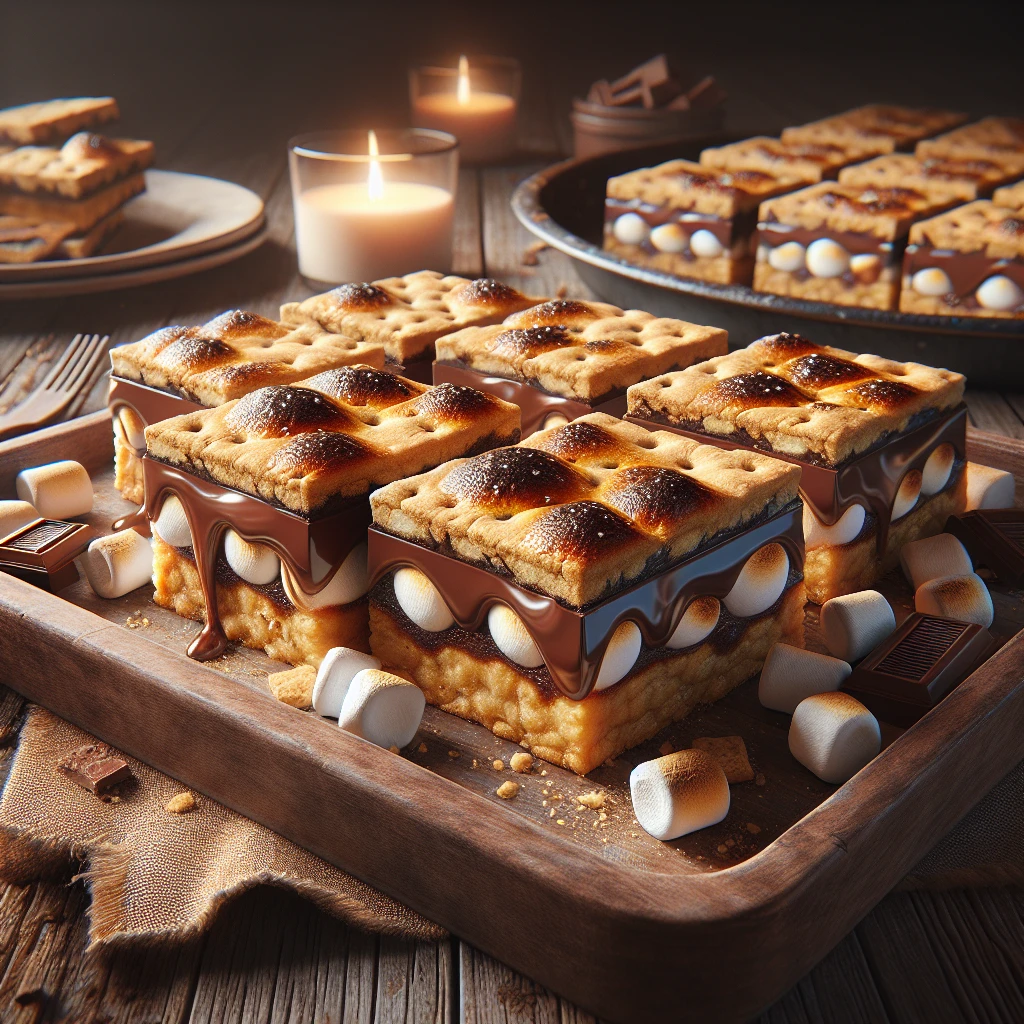
S'mores Cookie Bars
If you're a fan of s'mores and cookies, you're in for a treat with these S'mores Cookie Bars. Combining the best of both worlds, these bars offer a sweet, gooey experience without the need for a campfire. Perfect for a cozy night in or a fun gathering with friends.
This post may contain affiliate links. As an Amazon Associate, we earn from qualifying purchases.
Ingredients for S'mores Cookie Bars
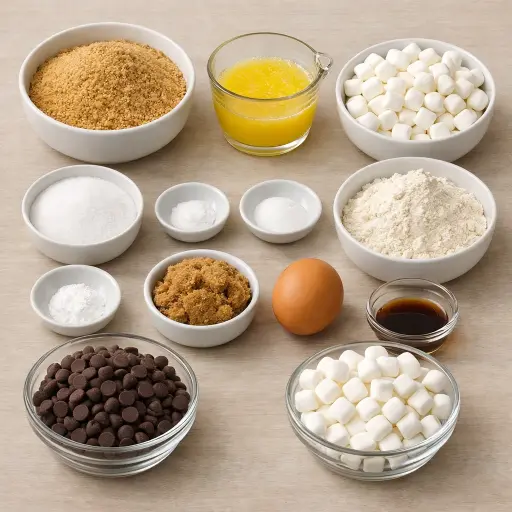
Graham cracker crumbs are the base of our crust, offering that classic s'mores flavor. Butter helps bind the crumbs together and gives richness. A touch of granulated sugar sweetens the crust ever so slightly, while salt enhances all the flavors. In the dough, all-purpose flour provides structure, while baking powder gives a little lift. Brown sugar adds a deeper sweetness and moisture to the dough. The egg contributes to the dough's texture, and vanilla extract adds warmth and aroma. Finally, semi-sweet chocolate chips and mini marshmallows bring the s'mores magic to life.
Why This S'mores Cookie Bars Works
In the oven, the graham cracker crumbs, butter, and sugar melt together and then firm up again, so the bottom turns into one solid crust instead of loose crumbs. As it bakes, that layer sets first and becomes sturdy enough to hold everything on top without falling apart.
Up above, the flour, egg, and brown sugar mixture bakes into a soft cookie layer. The egg and baking powder make it puff a little, so it isn’t dense like fudge. It stays chewy but strong, so the chocolate and marshmallows don’t sink all the way down.
While everything cooks, the chocolate chips soften and spread just enough to form little pockets of melted chocolate. At the same time, the mini marshmallows puff up, then start to brown on top. As they cool, the marshmallows shrink a bit and turn sticky and stretchy, which helps glue the chocolate and cookie layer together. After cooling, all three layers stay stacked as neat bars that can be sliced without crumbling.
S'mores Cookie Bars Tips & Tricks
- Use a sheet of parchment paper in the pan for easier removal and cleaning.
- Let the melted butter cool slightly before mixing with the graham crumbs to avoid a greasy crust.
- For an extra touch, try broiling the top for a minute at the end for a toastier marshmallow finish.
Mistakes To Avoid
Letting the bars bake too long can turn the marshmallows into hard, brittle caps and dry out the cookie layer underneath. Instead of soft, gooey tops, the marshmallows shrink, darken too much, and the edges of the bars become tough and crumbly.
Spreading the cookie dough roughly over the graham crust instead of pressing it into an even layer often leaves thin spots and gaps. During baking, those thin areas overcook while thicker patches stay underdone, so some bites are dry and hard while others are dense and pasty.
Packing the graham cracker crust too loosely causes it to crumble apart when sliced. The butter doesn’t bind the crumbs into a solid base, so the bottom layer falls away and the bars won’t hold together in neat squares.
Cutting the bars while they are still warm makes the whole pan collapse into a sticky mess. The chocolate is still melted and the marshmallows are stretchy, so the layers smear together and the bars lose their shape.
Equipment Used:
Ingredients
- 1 1/2 cups graham cracker crumbs
- 1/2 cup unsalted butter, melted
- 1/4 cup granulated sugar
- 1/2 teaspoon salt
- 3/4 cup all-purpose flour
- 1/2 teaspoon baking powder
- 1/2 cup brown sugar, packed
- 1 large egg
- 1 teaspoon vanilla extract
- 1 cup semi-sweet chocolate chips
- 1 1/2 cups mini marshmallows
Step-by-step Instructions
- 1. Preheat your oven to 350°F (175°C) and grease a 9x9-inch baking pan.
- 2. In a medium bowl, combine graham cracker crumbs, melted butter, granulated sugar, and salt. Press the mixture into the bottom of the prepared baking pan to form the crust.
- 3. In another bowl, whisk together flour, baking powder, and brown sugar. Add the egg and vanilla extract, mixing until just combined.
- 4. Spread the dough over the graham cracker crust, pressing gently to cover.
- 5. Sprinkle chocolate chips evenly over the dough, followed by a layer of mini marshmallows.
- 6. Bake in the preheated oven for 20-25 minutes, or until the marshmallows are golden brown and the edges are set.
- 7. Allow the bars to cool completely before cutting into squares and serving.
Trending Now

Old-Fashioned Bread Pudding
Discover the classic charm of Old-Fashioned Bread Pudding - a timeless dessert com...
View Recipe
Traditional Crisp Coleslaw
A classic coleslaw recipe featuring finely shredded cabbage and carrots tossed in ...
View Recipe
Traditional Italian Bruschetta
Experience the authentic taste of Italian bruschetta, a perfect blend of fresh tom...
View Recipe
Classic Banana Bread
Classic Banana Bread is a timeless dessert beloved for its moist texture and sweet...
View RecipeFrequently Asked Questions
- Can I use milk chocolate chips instead?
- Absolutely! If you prefer a sweeter chocolate, milk chocolate chips will work just fine.
- How do I store these bars?
- Store them in an airtight container at room temperature for up to 3 days. If you want to keep them longer, refrigerate for up to a week.
Serving Ideas for S'mores Cookie Bars
These bars are delightful on their own, but for an indulgent twist, serve them warm with a scoop of vanilla ice cream. They're also great for a dessert platter, paired alongside some fresh berries to balance the sweetness.
More Desserts Recipes

Rustic Vanilla Peach Cobbler
This rustic vanilla peach cobbler combines a rich, buttery crust with the sweet, v...
View Recipe
Traditional Lemon Curd
A classic, tangy lemon curd that is perfect for enhancing desserts, breakfast dish...
View Recipe
Traditional Cream Cheese Pie
A delightful and timeless dessert, Traditional Cream Cheese Pie offers a rich and ...
View Recipe
Timeless Cream Puff Delight
Indulge in a delectable Timeless Cream Puff Delight, a classic dessert featuring a...
View Recipe