Simple Artisan Sourdough Starter
If you've ever dreamed of baking your own bread from scratch, a simple artisan sourdough starter is your gateway to a world of homemade delight. With just a few ingredients and a bit of patience, you'll be well on your way to creating tangy, flavorful loaves that will make your kitchen the envy of the neighborhood.
This post may contain affiliate links. As an Amazon Associate, we earn from qualifying purchases.
Ingredients for Simple Artisan Sourdough Starter
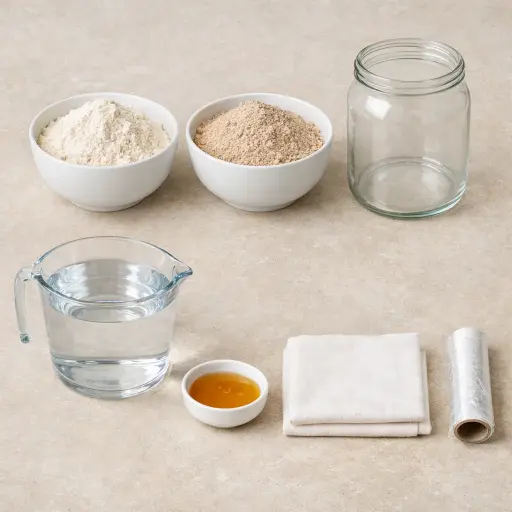
The backbone of your starter is all-purpose flour. It provides the necessary starches for the yeast and bacteria to feed on. Adding whole wheat flour gives a nutritional boost and can introduce more wild yeast, enhancing the starter's complexity. Water is the medium that allows these ingredients to mingle and ferment. A touch of honey is optional but acts as a gentle kick-starter, giving the natural yeast a little extra food in the early stages. For the container, a large glass jar is ideal to watch the fermentation process, and using a plastic wrap or clean cloth helps to prevent contamination while still allowing the mixture to breathe.
Why This Simple Artisan Sourdough Starter Works
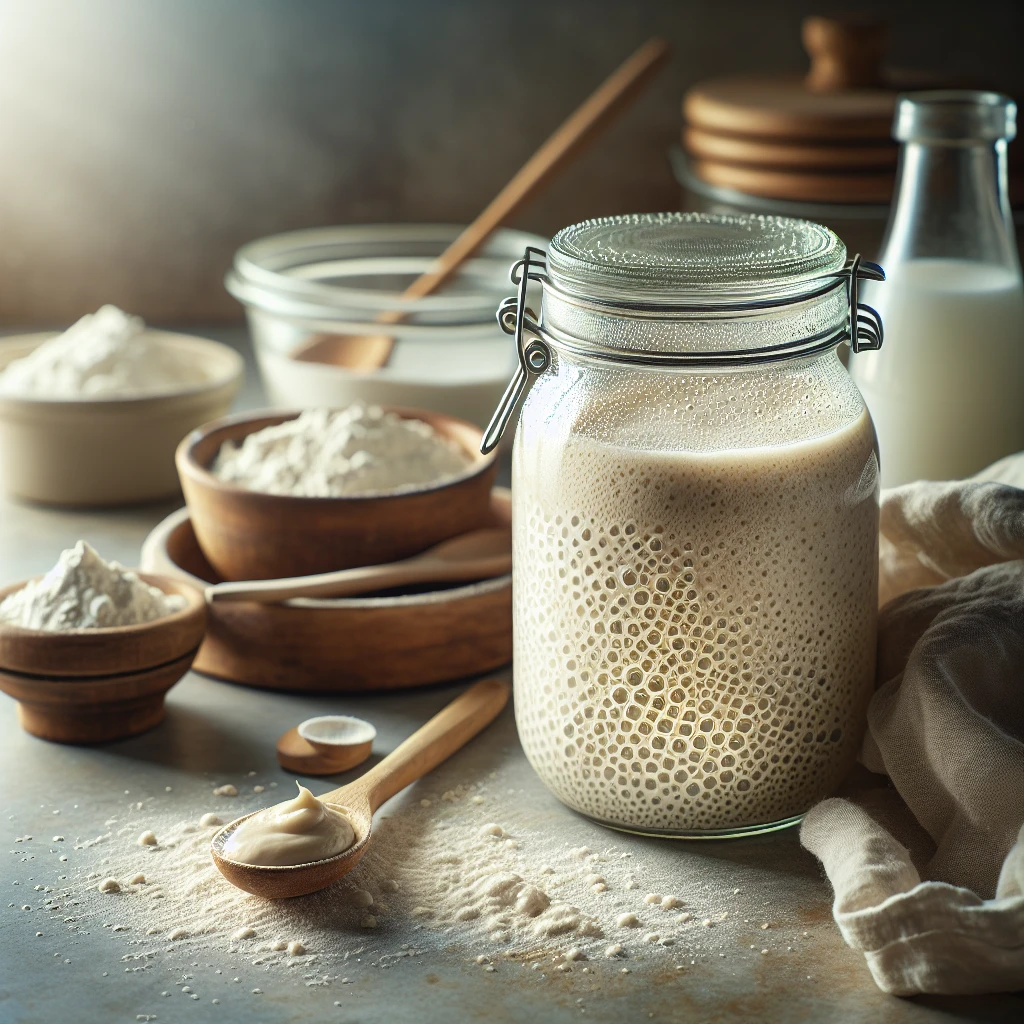
Over several days, the flour and water sit out and start to change. Wild yeast and bacteria from the air and from the flour move into the jar and find food. The honey gives them a small, easy snack at the start, so they wake up faster and begin to bubble sooner. As they eat the natural sugars in the flour, they give off gas and a little acid. That gas makes the starter rise and look foamy, and the acid gives it a tangy smell.
Each day, discarding half and feeding fresh flour and water keeps the tiny yeast strong and active. Old, tired food goes out, new food goes in. Over time, the whole jar shifts from a flat paste to something lively and stretchy. The mix thickens, then loosens as bubbles form, and it starts to rise and fall on a regular rhythm. By the time it smells pleasantly sour and looks bubbly all over, the yeast and bacteria are balanced and ready to raise bread dough.
Simple Artisan Sourdough Starter Tips & Tricks
- If your starter doesn’t bubble after a few days, try moving it to a warmer spot — warmth encourages fermentation.
- Use filtered or bottled water if your tap water is heavily chlorinated; chlorine can inhibit yeast growth.
- Save the discarded starter! It can be used in pancakes, waffles, or even as a natural fertilizer for plants.
Mistakes To Avoid
Covering the jar too tightly with plastic wrap can trap gases and stop fresh air from reaching the mixture. In that case, the natural yeast has a hard time growing, while other less helpful microbes can take over. The starter often ends up flat, with a strange smell and no bubbling strength to raise bread.
Using hot water instead of room‑temperature water often kills off the wild yeast before it even gets going. The mixture may look like a thick paste that never changes from day to day. After several feedings, it still stays still and heavy, with no foam or rise.
Skipping the daily discard and just adding more flour and water each time makes the jar fill up with weak, unfed starter. The yeast gets spread too thin in a big mass of flour, so it cannot build up strength. The result is a large amount of starter that looks dull and barely puffs up.
Letting the starter sit in a very cold room slows everything down so much that it seems dead. Bubbles form very slowly, and the surface may look flat for days. This often leads to feeding at the wrong time, and the starter never reaches a strong, active stage.
Equipment Used:
Ingredients
- 2 cups all-purpose flour
- 1 cup whole wheat flour
- 2 cups water
- 1 teaspoon honey
- Large glass jar
- Plastic wrap or clean cloth
Step-by-step Instructions
- 1. Combine 1 cup of all-purpose flour with 1 cup of water in a large glass jar. Stir well.
- 2. Add 1 teaspoon of honey and mix until dissolved.
- 3. Cover the jar with a clean cloth or plastic wrap and let it sit at room temperature for 24 hours.
- 4. After 24 hours, discard half of the mixture and add 1 cup of all-purpose flour and 1 cup of water. Stir well.
- 5. Repeat the process every 24 hours for 5-7 days, or until the starter is bubbly and has a tangy aroma.
Trending Now

Old-Fashioned Bread Pudding
Discover the classic charm of Old-Fashioned Bread Pudding - a timeless dessert com...
View Recipe
Traditional Italian Bruschetta
Experience the authentic taste of Italian bruschetta, a perfect blend of fresh tom...
View Recipe
Classic Green Beans
Discover the timeless delight of Classic Green Beans, a simple yet flavorful side ...
View Recipe
Classic Banana Bread
Classic Banana Bread is a timeless dessert beloved for its moist texture and sweet...
View RecipeFrequently Asked Questions
- Why do I need to discard half the starter?
- This keeps the acidity in check and prevents the need for an enormous amount of flour to feed the starter.
- What if my starter smells off?
- A healthy starter should have a tangy, slightly yeasty smell. If it smells like alcohol or is unpleasant, it might need more frequent feeding.
- Can I speed up the process?
- Patience is key! Rushing can affect the development of flavors and the structure of your bread.
Serving Ideas for Simple Artisan Sourdough Starter
Your sourdough starter can lead to a variety of delicious breads. Try pairing your freshly baked sourdough loaf with a simple olive oil and balsamic vinegar dip, or use it as a base for a rustic open-faced sandwich with fresh tomatoes and basil. It’s also fantastic toasted with a slather of good butter and a sprinkle of sea salt.
More Breads & Baked Goods Recipes

Traditional Italian Easter Bread
Savor the delightful taste of a classic Italian Easter bread, a sweet, soft, and s...
View Recipe
Old-Fashioned Pineapple Bread
A delightful and flavorful bread infused with juicy pineapple, perfect for breakfa...
View Recipe
Old-Fashioned Blueberry Muffins
Transport yourself to simpler times with these delightful old-fashioned blueberry ...
View Recipe
Strawberry Basil Scones
These tender scones combine the sweetness of fresh strawberries with a hint of pep...
View Recipe