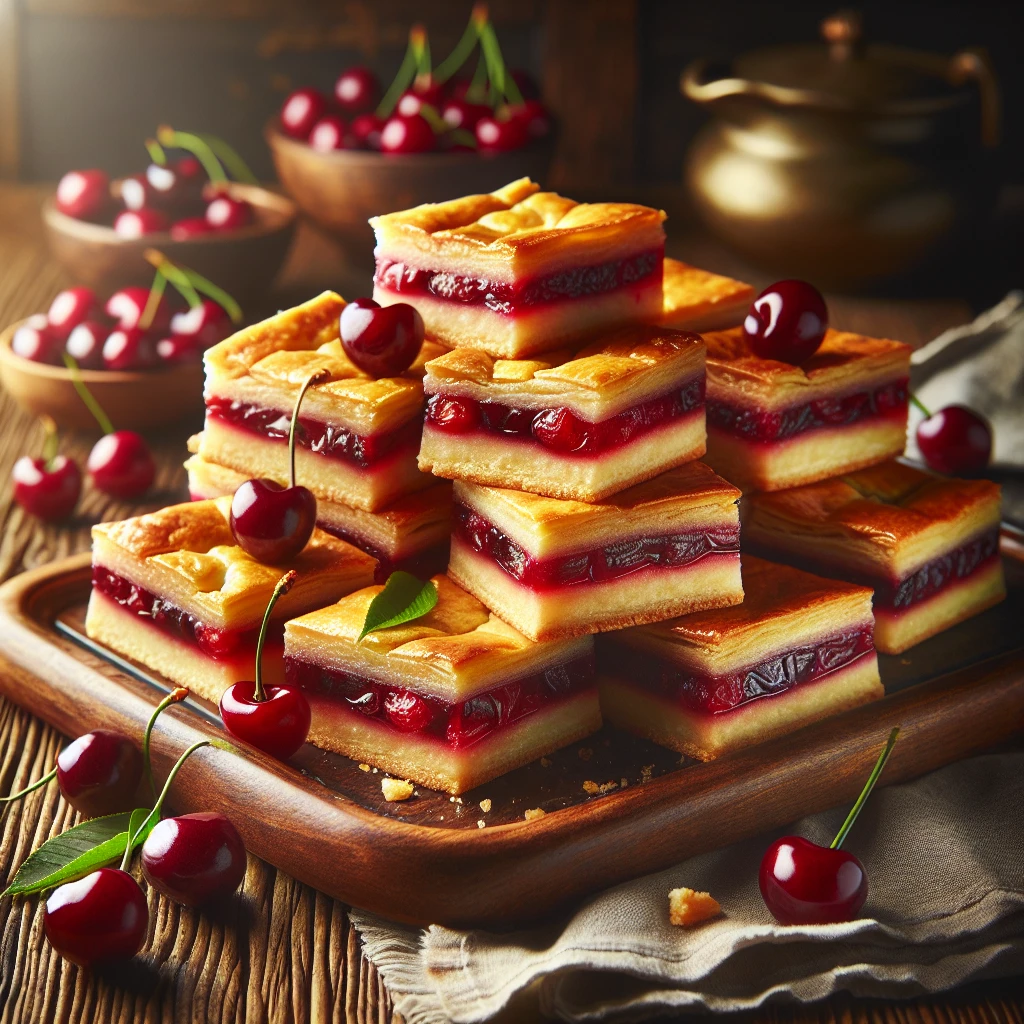
Old-Fashioned Cherry Squares
If you're in the mood for a treat that combines the nostalgia of childhood desserts with the ease of modern baking, these Old-Fashioned Cherry Squares are just the ticket. With a buttery, crumbly base and a luscious cherry filling, these squares are perfect for sharing at gatherings or savoring solo with a cup of tea.
This post may contain affiliate links. As an Amazon Associate, we earn from qualifying purchases.
Ingredients for Old-Fashioned Cherry Squares
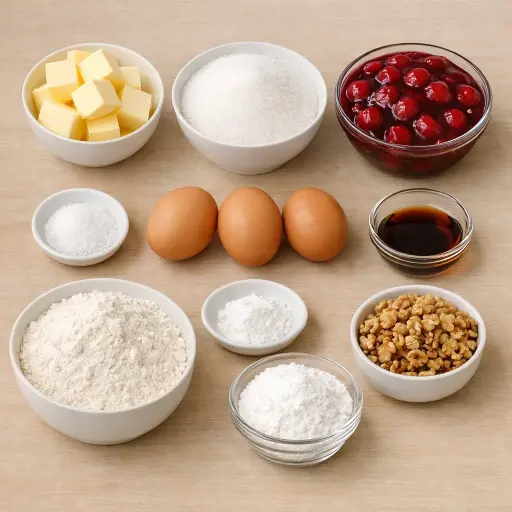
Butter is the base of this recipe, lending a rich flavor and tender crumb to the squares. You'll want to make sure it's unsalted for better control over the flavors. Sugar adds sweetness, but also helps create a soft, moist texture. A pinch of salt enhances the overall flavor, balancing out the sweetness of the cherries. The eggs bind everything together, providing structure to the squares. Vanilla extract adds warmth and depth to the flavor profile.
The flour is the main structure-giver here, and when combined with baking powder, it ensures a lovely, light rise. The star of the show, the cherry pie filling, brings that classic tartness and bright red hue. Optional walnuts add a delightful crunch if you're a fan of texture. Finally, a dusting of powdered sugar on top turns these squares into a picture-perfect dessert.
Why This Old-Fashioned Cherry Squares Works
During mixing, the soft butter, sugar, and eggs trap a lot of tiny air pockets. That fluffy batter is what lets the bars rise a bit and stay tender instead of dense. The flour and baking powder give the batter enough structure so it can hold the cherry filling without sinking, but it still stays soft when baked.
Once the pan goes in the oven, the bottom layer of batter starts to set first. It firms up into a cake-like base that can support the heavy cherry pie filling. As the cherries heat, the filling loosens a little and spreads into the gaps, but the set bottom layer keeps it from leaking through. The dollops of batter on top slowly spread and bake around the cherries, so there are pockets of cake and pockets of fruit.
By the time it is golden, the eggs and flour have fully set and locked everything together. Cooling in the pan lets the bars firm up so they slice cleanly, while the cherry layer stays soft and a little jammy in the middle.
Old-Fashioned Cherry Squares Tips & Tricks
- Ensure your butter is at room temperature for easier creaming with sugar.
- Use a spatula to fold in the flour mixture gently to avoid overmixing.
- Let the squares cool completely before cutting to get clean, neat edges.
- If you're out of walnuts, try pecans or skip the nuts entirely for a softer bite.
Mistakes To Avoid
Spreading all the batter in the pan at once instead of saving some for the top makes the bars bake like a solid cake layer with a wet cherry layer sitting on it. The cherry filling then sinks in and can make the bottom gummy while the top dries out and turns tough.
Letting the bars bake until the toothpick is completely clean from the cherry layer leads to overbaking. The edges turn hard and dry, and the top can get too dark while the middle still feels a bit sticky from the filling, which is actually normal.
Skipping the step of creaming the butter and sugar until light and fluffy leaves the batter dense and heavy. In the oven, this batter doesn’t rise much, so the bars come out flat and compact instead of soft and slightly cakey.
Stirring the flour mixture in for too long after it’s added causes the batter to tighten up. During baking, this overworked batter sets into a chewy, bready texture instead of a tender crumb.
Equipment Used:
Ingredients
- 1 cup unsalted butter
- 1 3/4 cups granulated sugar
- 1/2 teaspoon salt
- 3 large eggs
- 1 1/2 teaspoons vanilla extract
- 2 1/2 cups all-purpose flour
- 1 teaspoon baking powder
- 1 can (21 oz) cherry pie filling
- 1/2 cup chopped walnuts (optional)
- Powdered sugar for dusting
Step-by-step Instructions
- Step 1: Preheat your oven to 350°F (175°C) and lightly grease a 9x13-inch baking dish.
- Step 2: In a large mixing bowl, cream together the butter, sugar, and salt until light and fluffy.
- Step 3: Beat in the eggs one at a time, then stir in the vanilla extract.
- Step 4: In a separate bowl, whisk together the flour and baking powder.
- Step 5: Gradually blend the dry ingredients into the wet mixture until just combined.
- Step 6: Spread two-thirds of the batter into the prepared baking dish.
- Step 7: Evenly spread the cherry pie filling over the batter, then spoon the remaining batter on top in small dollops.
- Step 8: Sprinkle with chopped walnuts if using.
- Step 9: Bake for 40-45 minutes, or until the top is golden brown and a toothpick inserted into the center comes out clean.
- Step 10: Allow to cool completely in the dish, then dust with powdered sugar before slicing into bars.
Trending Now

Old-Fashioned Bread Pudding
Discover the classic charm of Old-Fashioned Bread Pudding - a timeless dessert com...
View Recipe
Classic Green Beans
Discover the timeless delight of Classic Green Beans, a simple yet flavorful side ...
View Recipe
Traditional Italian Bruschetta
Experience the authentic taste of Italian bruschetta, a perfect blend of fresh tom...
View Recipe
Traditional Crisp Coleslaw
A classic coleslaw recipe featuring finely shredded cabbage and carrots tossed in ...
View RecipeFrequently Asked Questions
- Can I use fresh cherries instead of canned pie filling?
- Absolutely! Just cook them down with some sugar and a bit of cornstarch until thickened.
- Can I make this gluten-free?
- Yes, substitute the all-purpose flour with a 1:1 gluten-free baking blend.
- How do I store leftovers?
- Keep them in an airtight container at room temperature for up to three days or refrigerate for longer shelf life.
Serving Ideas for Old-Fashioned Cherry Squares
These cherry squares are delightful on their own, but if you're in the mood to elevate them, try serving with a scoop of vanilla ice cream or a dollop of whipped cream. A sprinkle of toasted coconut on top before serving can also add an exotic twist. Perfect for a summer picnic or a cozy winter's evening indoors.
More Desserts Recipes

Rustic Vanilla Peach Cobbler
This rustic vanilla peach cobbler combines a rich, buttery crust with the sweet, v...
View Recipe
Traditional Lemon Curd
A classic, tangy lemon curd that is perfect for enhancing desserts, breakfast dish...
View Recipe
Traditional Cream Cheese Pie
A delightful and timeless dessert, Traditional Cream Cheese Pie offers a rich and ...
View Recipe
Timeless Cream Puff Delight
Indulge in a delectable Timeless Cream Puff Delight, a classic dessert featuring a...
View Recipe