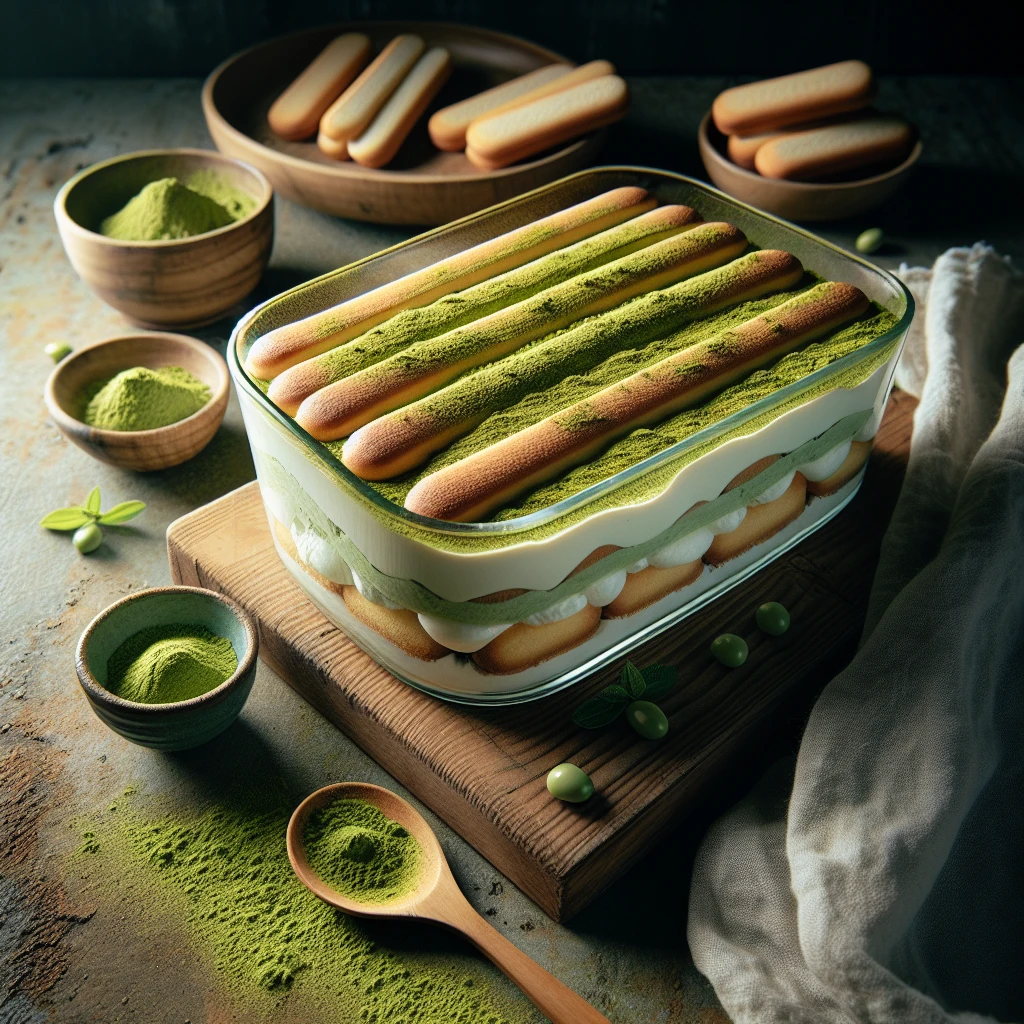
Green Tea Tiramisu
Ever thought about combining the creamy decadence of tiramisu with the earthy elegance of matcha? This Green Tea Tiramisu is a delightful twist on the classic Italian dessert, bringing a unique flavor profile that's both refreshing and indulgent.
This post may contain affiliate links. As an Amazon Associate, we earn from qualifying purchases.
Ingredients for Green Tea Tiramisu
Mascarpone cheese gives the tiramisu its creamy and rich texture, blending beautifully with the matcha. Heavy cream adds lightness and volume when whipped, making the dessert fluffy. Granulated sugar balances the earthy flavor of matcha without overpowering it. Matcha powder is the star, offering a vibrant green hue and a subtly bitter taste that complements the sweetness. Honey adds a floral note, enhancing the matcha's natural flavors. Ladyfingers act as the structural base, soaking up the matcha mixture for a melt-in-the-mouth experience.
Why This Green Tea Tiramisu Works
As the mascarpone and sugar are mixed, the sugar smooths out the cheese and loosens it, so it blends easily with the whipped cream. Whipping the heavy cream fills it with tiny air bubbles, so it becomes thick and fluffy instead of runny. When the whipped cream is folded into the mascarpone, all that air stays trapped, and the whole mixture turns into a light, stable filling that can sit on the ladyfingers without sinking.
In the hot water, the matcha and honey dissolve and spread evenly, so every dip of ladyfinger soaks up the same green tea taste. The ladyfingers drink in that warm liquid very fast, softening just enough on the outside while the inside still holds its shape. Once layered in the dish, the cream mixture settles down into the tiny gaps between the soaked cookies. During the long rest in the fridge, the ladyfingers keep absorbing moisture from the cream, so the layers relax and cling to each other. By the time it is chilled, the dessert slices cleanly, with soft cake-like layers that stay together instead of falling apart.
Green Tea Tiramisu Tips & Tricks
- Use a sifter for the matcha powder to prevent clumps when dusting.
- Chill your mixing bowl and beaters before whipping the cream for better results.
- If you're not a fan of matcha's intensity, reduce the powder slightly.
Mistakes To Avoid
Letting the ladyfingers soak too long in the matcha mixture makes them swell up and fall apart. In the dish, this turns into a wet, mushy layer that doesn’t hold its shape, so the tiramisu slices collapse and look more like pudding than layers.
Whipping the cream past soft peaks causes it to turn grainy and start to separate. Once folded into the mascarpone, the mixture looks rough instead of smooth and can even leak liquid, so the filling sets with a slightly curdled texture instead of a light, even cream.
Folding the whipped cream into the mascarpone too roughly or too fast knocks out most of the air. The cream layer then sets dense and heavy, so the dessert feels thick and flat instead of soft and fluffy.
Skipping the chill time or cutting it very short means the layers don’t have time to firm up. The tiramisu then scoops out in a loose, slumpy mess, with the cream sliding off the ladyfingers instead of holding clean squares.
Equipment Used:
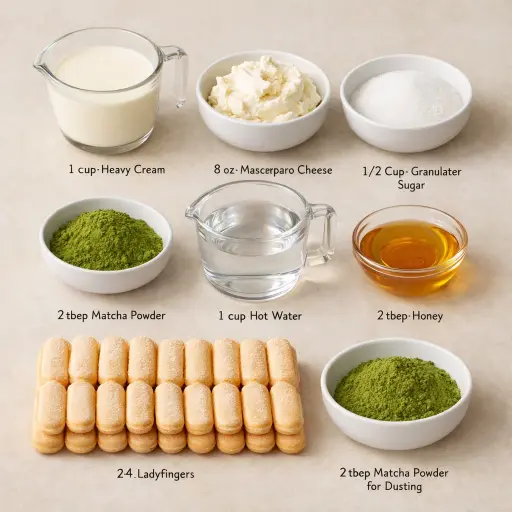
Ingredients
- 1 cup heavy cream
- 8 oz mascarpone cheese
- 1/2 cup granulated sugar
- 2 tbsp matcha powder
- 1 cup hot water
- 2 tbsp honey
- 24 ladyfingers
- 2 tbsp matcha powder for dusting
Step-by-step Instructions
- 1. In a large mixing bowl, combine the mascarpone cheese and half of the sugar. Mix until smooth.
- 2. In another bowl, whip the heavy cream with the remaining sugar until soft peaks form.
- 3. Gently fold the whipped cream into the mascarpone mixture until well combined.
- 4. Dissolve the matcha powder and honey in hot water, stirring until fully mixed.
- 5. Quickly dip each ladyfinger into the matcha mixture and layer them in the bottom of a 9x9 inch dish.
- 6. Spread half of the mascarpone mixture over the ladyfingers evenly.
- 7. Add another layer of matcha-dipped ladyfingers, followed by the remaining mascarpone mixture.
- 8. Dust the top with additional matcha powder for garnish.
- 9. Refrigerate for at least 4 hours or overnight before serving.
Trending Now

Classic Cucumber Salad
A refreshing and light cucumber salad featuring crisp cucumbers and a tangy vinaig...
View Recipe
Classic Banana Bread
Classic Banana Bread is a timeless dessert beloved for its moist texture and sweet...
View Recipe
Zesty Summer Squash Casserole
This delightful summer squash casserole combines vibrant garden-fresh vegetables w...
View Recipe
Traditional Dump Cake
Discover the timeless delight of the Traditional Dump Cake, a simple and scrumptio...
View RecipeFrequently Asked Questions
- Can I use another type of tea instead of matcha?
- While matcha gives a unique flavor, you can experiment with other teas, but they won't provide the same vibrant color.
- How long can I store the tiramisu?
- It can be stored in the refrigerator for up to 3 days. Keep it covered to prevent it from drying out.
Serving Ideas for Green Tea Tiramisu
Consider serving this tiramisu with fresh berries on the side to add a touch of acidity and color contrast. A dollop of whipped cream topped with a sprinkle of matcha powder can enhance the presentation and taste.
More Desserts Recipes

Rustic Vanilla Peach Cobbler
This rustic vanilla peach cobbler combines a rich, buttery crust with the sweet, v...
View Recipe
Traditional Lemon Curd
A classic, tangy lemon curd that is perfect for enhancing desserts, breakfast dish...
View Recipe
Traditional Cream Cheese Pie
A delightful and timeless dessert, Traditional Cream Cheese Pie offers a rich and ...
View Recipe
Timeless Cream Puff Delight
Indulge in a delectable Timeless Cream Puff Delight, a classic dessert featuring a...
View Recipe