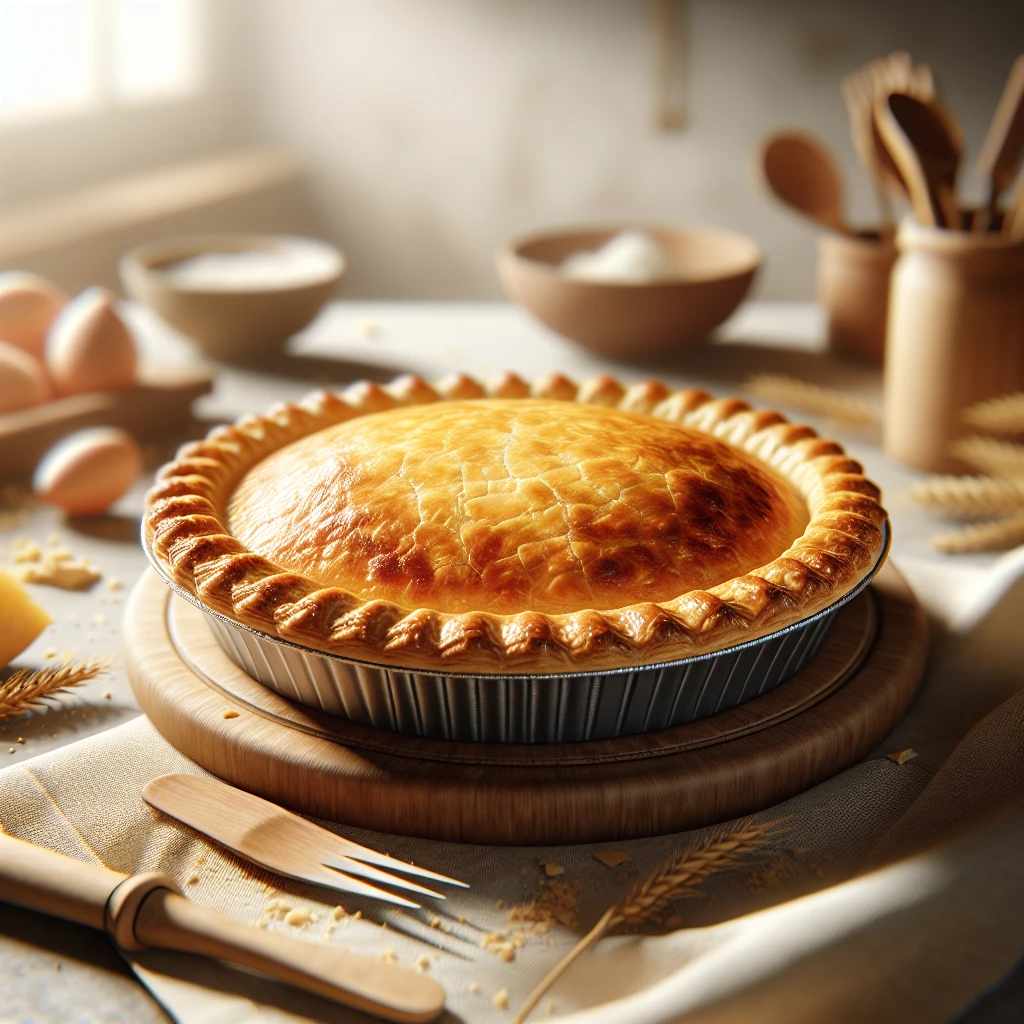
Golden Flake Gluten-Free Pie Crust
If you're on the hunt for a perfectly flaky pie crust that just happens to be gluten-free, you've hit the jackpot. This Golden Flake Gluten-Free Pie Crust delivers on texture and taste, making it the perfect base for your favorite pies, whether sweet or savory.
This post may contain affiliate links. As an Amazon Associate, we earn from qualifying purchases.
Ingredients for Golden Flake Gluten-Free Pie Crust
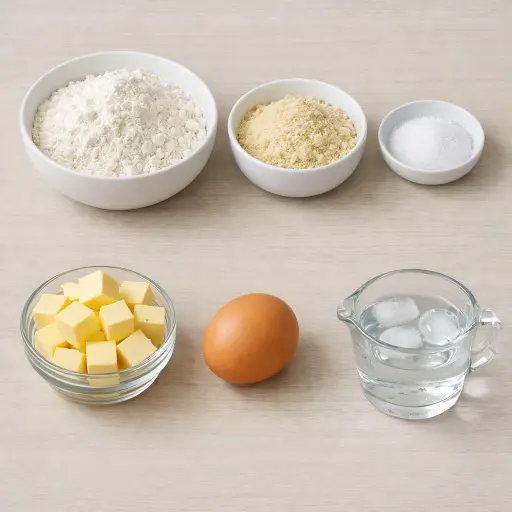
Let's start with the backbone of our crust, the gluten-free all-purpose flour blend. It provides the structure we need without the gluten. Adding almond flour brings a subtle nutty flavor and a tender crumb, enhancing both taste and texture. A touch of sugar balances the flavors, while salt enhances them.
Butter is our main fat, and using it cold and cubed helps create those desirable flaky layers. The egg acts as a binder, bringing everything together with a bit more richness. Finally, ice water is crucial for moisture, helping to form a cohesive dough without making it sticky.
Why This Golden Flake Gluten-Free Pie Crust Works
Cold butter is doing most of the work here. When the hard butter cubes are rubbed into the gluten-free flour and almond flour, they stay in little flat bits instead of melting. In the oven, those bits of butter melt and leave tiny gaps behind. Those gaps turn into the flaky layers, so the crust doesn’t bake up dense or tough.
Egg and almond flour step in to do the job that gluten usually does. As the crust bakes, the egg firms up and acts like glue, so the crust holds together instead of crumbling apart. Almond flour adds a bit of fat and softness, so the crust doesn’t dry out.
Resting the dough in the fridge lets the flour soak up the egg and water evenly. During this time the butter chills again, so it stays solid when the dough is rolled out. In the oven, everything sets in place: the butter melts, the egg sets, and the crust becomes crisp at the edges but still tender when sliced.
Golden Flake Gluten-Free Pie Crust Tips & Tricks
- Keep all your ingredients cold; it’s key to a flaky crust.
- If the dough cracks while rolling, lightly wet your fingers and patch it up.
- Wrap and store any leftover dough in the fridge for up to two days or freeze for later use.
Mistakes To Avoid
Using butter that is even slightly soft makes the biggest difference here. Once the butter warms up, it smears into the flour instead of staying in small cold bits, so the crust bakes up dense and greasy instead of light and flaky.
Adding all the ice water at once often leads to a sticky, heavy dough. The flour soaks up too much water, the dough turns pasty, and in the oven the crust can shrink down the sides of the pan and bake up tough instead of crisp.
Skipping the chill time, or cutting it too short, means the butter and egg stay warm and loose in the dough. In the oven, the fat melts too fast, the crust slumps, and the edges lose their shape instead of holding a clean crimp.
Rolling the dough too thin or patching it with lots of scraps causes weak spots. Those thin or overworked areas dry out, crack, or even form holes while baking, so fillings can leak and the bottom crust can turn soggy in patches.
Equipment Used:
Ingredients
- 1 1/4 cups gluten-free all-purpose flour blend
- 1/4 cup almond flour
- 1 tablespoon sugar
- 1/2 teaspoon salt
- 1/2 cup unsalted butter, cold and cubed
- 1 large egg
- 2 tablespoons ice water
Step-by-step Instructions
- 1. In a large mixing bowl, whisk together the gluten-free all-purpose flour blend, almond flour, sugar, and salt.
- 2. Add the cold, cubed butter to the flour mixture and use a pastry cutter or your fingers to blend until the mixture resembles coarse crumbs.
- 3. In a small bowl, beat the egg and add it to the flour-butter mixture. Stir until the dough begins to come together.
- 4. Add ice water, one tablespoon at a time, mixing until the dough is cohesive and can be pressed into a ball.
- 5. Flatten the dough into a disk, wrap it in plastic wrap, and refrigerate for at least 1 hour.
- 6. Roll out the chilled dough on a lightly floured surface to fit your pie pan.
- 7. Carefully transfer the rolled-out dough to the pie pan, pressing it gently into place. Trim and crimp the edges as desired.
- 8. Pre-bake the crust if using a no-bake filling, or fill and bake according to your pie recipe.
Trending Now

Zesty Summer Squash Casserole
This delightful summer squash casserole combines vibrant garden-fresh vegetables w...
View Recipe
Classic Cucumber Salad
A refreshing and light cucumber salad featuring crisp cucumbers and a tangy vinaig...
View Recipe
Classic Banana Bread
Classic Banana Bread is a timeless dessert beloved for its moist texture and sweet...
View Recipe
Traditional Dump Cake
Discover the timeless delight of the Traditional Dump Cake, a simple and scrumptio...
View RecipeFrequently Asked Questions
- Can I make this dairy-free?
- Yes, substitute the butter with a dairy-free alternative like vegan butter or coconut oil.
- What if I don’t have almond flour?
- You can replace it with more gluten-free all-purpose flour, though it might slightly alter the texture.
- How do I know when my pie crust is done baking?
- Look for a golden-brown color and a crisp texture. The edges will start to pull away from the pan slightly.
Serving Ideas for Golden Flake Gluten-Free Pie Crust
This crust is versatile enough for a classic apple pie or a savory quiche. For a summer treat, fill it with fresh berries and a dollop of whipped cream. Or, for a warm, cozy option, try a pumpkin filling spiced with cinnamon and nutmeg.
More Gluten-Free Recipes
Zucchini and Potato Smash
A delightful and nutritious baby food recipe combining tender zucchini and creamy ...
View Recipe
Traditional Mexican Tacos
Savor the authentic taste of Mexico with these Traditional Mexican Tacos that are ...
View Recipe
Herb-Roasted Spaghetti Squash
Discover a delicious and healthy way to prepare spaghetti squash with this herb-ro...
View Recipe
Butternut Squash Puree
Introduce your baby to the gentle sweetness of butternut squash with this easy-to-...
View Recipe