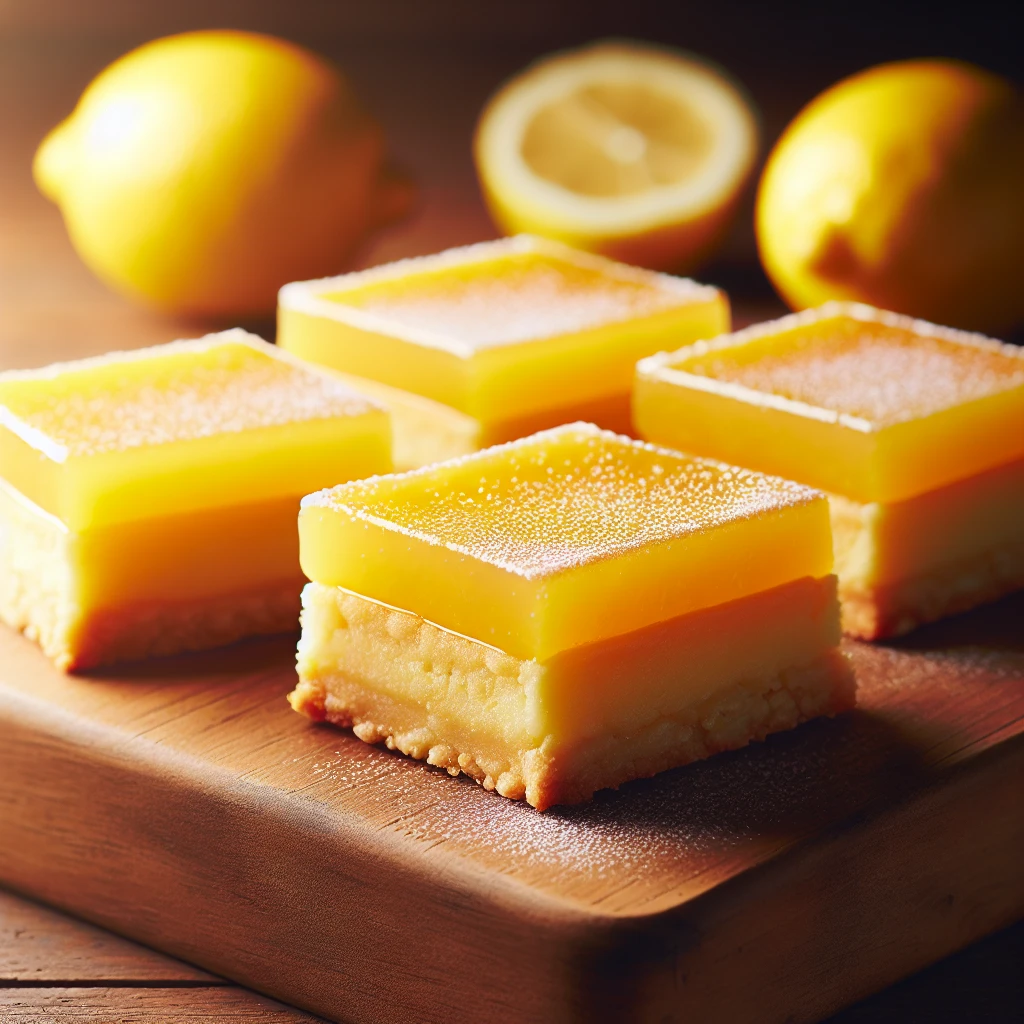
Classic Lemon Bars
Classic Lemon Bars are a delightful combination of tangy and sweet, with a buttery crust that melts in your mouth. They're the perfect treat for a bright and refreshing dessert, making them a timeless favorite for gatherings or a simple afternoon snack.
This post may contain affiliate links. As an Amazon Associate, we earn from qualifying purchases.
Ingredients for Classic Lemon Bars
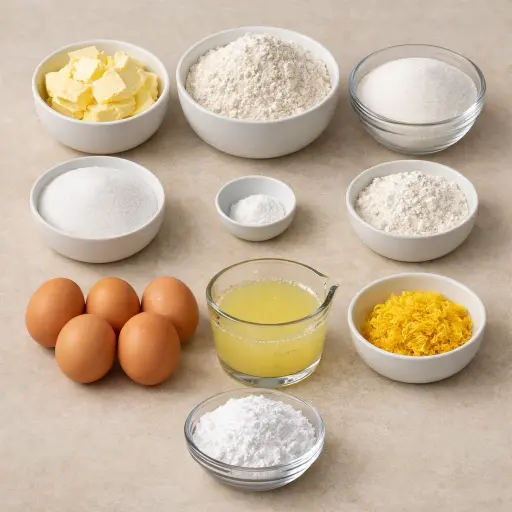
The base of these bars is the butter, which provides richness and helps create that crumbly, melt-in-your-mouth texture. The flour forms the structure of both the crust and the filling. Granulated sugar sweetens the crust and filling, balancing the tartness of the lemons. A pinch of salt enhances all the flavors. The eggs give the filling its smooth, custard-like consistency, while the lemon juice and zest deliver that bold citrus punch. Finally, a dusting of powdered sugar adds a touch of sweetness and a pretty finish.
Why This Classic Lemon Bars Works
In the oven, the butter, flour, sugar, and salt melt and bake into a firm crust. The butter softens and spreads through the flour, then the heat makes it set into a shortbread layer that stays together when sliced. Sugar in the crust melts and starts to brown, so the bottom turns lightly golden and a little crisp instead of staying pale and doughy. By baking this layer first, the crust has time to firm up and can hold the soft lemon topping without going soggy right away.
Once the lemon mixture goes on top, the eggs are what make it work. As the pan goes back into the oven, the eggs slowly set and thicken the lemon juice, sugar, and flour into a smooth, custard-like layer. The small amount of flour in the filling keeps it from running and gives it a soft, sliceable texture. While it cools, the filling finishes firming up, so the bars cut cleanly and the crust and lemon layer stay stacked instead of sliding apart.
Classic Lemon Bars Tips & Tricks
- Use freshly squeezed lemon juice for the best flavor. Bottled juice won’t give you the same zing.
- For easy release, line your baking dish with parchment paper, leaving some overhang to lift the bars out.
- Zest the lemons before juicing them. It’s much easier and you’ll get all that fragrant zest without the mess.
Mistakes To Avoid
Letting the crust mixture stay too soft and not crumbly enough makes it hard to press in an even layer. In the oven this kind of dough can melt and bubble instead of baking into a firm base, so the lemon layer sinks in and the bars end up soggy on the bottom.
Pouring the lemon filling onto a cooled crust causes trouble. The hot filling then has to reheat the base before it can set, so the layers don’t bond well and the lemon topping can slide or separate when sliced.
Taking the lemon bars out of the oven while the center still jiggles a lot leaves the filling undercooked. As they cool, the middle stays gooey and can run out when cut, instead of holding clean, soft squares.
Cutting into the bars before they are fully cool breaks the structure. The warm filling sticks to the knife and pulls away from the crust, so the pieces tear, smear, and look messy instead of neat.
Equipment Used:
Ingredients
- 1 cup unsalted butter, softened
- 2 cups all-purpose flour
- 1/2 cup granulated sugar
- 1/4 teaspoon salt
- 1 and 1/2 cups granulated sugar
- 1/4 cup all-purpose flour
- 4 large eggs
- 2/3 cup freshly squeezed lemon juice
- 1 tablespoon lemon zest
- Powdered sugar for dusting
Step-by-step Instructions
- 1. Preheat your oven to 350°F (175°C). Grease a 9x13 inch baking dish.
- 2. In a medium bowl, combine 1 cup of softened butter, 2 cups of flour, 1/2 cup of sugar, and 1/4 teaspoon of salt. Mix until crumbly.
- 3. Press the mixture into the prepared baking dish evenly and bake for 20 minutes or until golden.
- 4. In another bowl, whisk together 1 and 1/2 cups of sugar and 1/4 cup flour. Add in the 4 eggs, lemon juice, and zest. Mix until smooth.
- 5. Pour the lemon mixture over the hot crust and return to the oven. Bake for an additional 20-25 minutes, or until the filling is set.
- 6. Allow to cool completely. Dust with powdered sugar before slicing into bars.
Trending Now

Old-Fashioned Bread Pudding
Discover the classic charm of Old-Fashioned Bread Pudding - a timeless dessert com...
View Recipe
Hearty Breakfast Casserole
This Hearty Breakfast Casserole is the quintessential morning dish, combining savo...
View Recipe
Traditional Stuffed Peppers
Explore the delightful blend of seasoned beef, rice, and tomato sauce nestled in v...
View Recipe
Traditional Lemon Pound Cake
A delightful and moist traditional lemon pound cake infused with the fresh zest an...
View RecipeFrequently Asked Questions
- Can I make these lemon bars ahead of time?
- Yes, they keep well in the refrigerator for up to a week. Just dust with powdered sugar before serving.
- Can I freeze lemon bars?
- Absolutely! Slice them first, then layer in a container with parchment paper between layers. They’ll keep for up to 3 months.
- What can I use instead of powdered sugar for dusting?
- If you're out of powdered sugar, you can skip the dusting or use a light layer of granulated sugar.
Serving Ideas for Classic Lemon Bars
These lemon bars are lovely on their own, but you can dress them up for a fancier occasion by serving with a dollop of freshly whipped cream and a sprig of mint. They also pair beautifully with a light, herbal tea for a refreshing afternoon treat.
More Desserts Recipes

Rustic Vanilla Peach Cobbler
This rustic vanilla peach cobbler combines a rich, buttery crust with the sweet, v...
View Recipe
Traditional Lemon Curd
A classic, tangy lemon curd that is perfect for enhancing desserts, breakfast dish...
View Recipe
Traditional Cream Cheese Pie
A delightful and timeless dessert, Traditional Cream Cheese Pie offers a rich and ...
View Recipe
Timeless Cream Puff Delight
Indulge in a delectable Timeless Cream Puff Delight, a classic dessert featuring a...
View Recipe